How To Put A Tire Back On The Rim
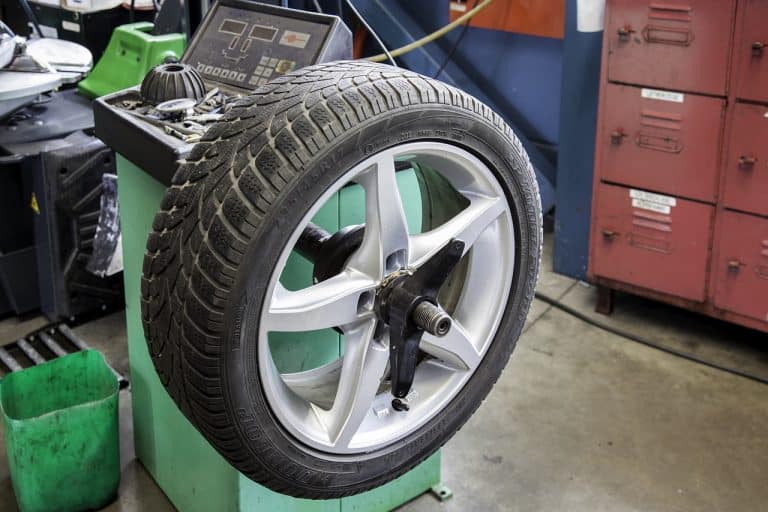
Self-mounting tires can be cost-effective, particularly if you have access to tire mounting equipment. With nothing more than a pry bar and a lot of work, you can install your own tires at home. After mounting your wheels and tires, it is strongly advised that you get them balanced at an auto repair shop.
Before you begin, make certain that you have the correct tire and rim size; for example, an 18-inch wheel will accommodate a tire that measures 18 inches. In order to avoid having to change your tires on a regular basis, it is advisable to invest in tire-changing equipment. Make sure you have the following items within easy reach at all times. Basically, all you need is two 4-foot pry bars, preferably with flat ends for tire removal, and a pair of pliers. A tool for separating the tire bead, a rubber hammer, and a tool for extracting the core from the valve stem.
Using A Tire Mounting Machine
Before anything else, remember to be aware of essential safety measures when removing and mounting tires on rims. Tires may explode if specific elements are missed. Always use tires that are the correct size and structure for the wheel. Verify that the wheel diameter matches the tire sidewall. Never seat tire beads at 40 PSI. Never overinflate a tire once the beads are placed.
Step 1: Put a large amount of tire bead lubricant
Apply much tire bead lubricant to the tire beads and the rim. Tire lubrication is available at your local car parts store. To make it simpler to seat the tire on the rim to be inflated, spray the tire lubricant generously onto the inner lip of the tire (referred to as the bead) as well as the outside edge of the rim.
If your lubricant comes in a jar rather than a spray bottle, use a cloth or wooden dowel to apply it to the same edges. Don’t use soapy water or automotive grease for lubrication. Dish soap does not provide adequate lubrication, and grease can be exceedingly difficult to remove from the wheel. Bead lubricant is slippy, yet it dries and allows the bead to set.
Step 2: Insert the valve stem
If there isn’t already a valve stem connected to the wheel, you’ll need to attach one in order to inflate the tire after it’s been attached to the wheel. There will be one hole on the inside of the rim that will run all the way through to the outside. From within the rim, insert a valve stem that has been cut to fit through a hole on the exterior. Next, using pliers, pull the stem through until it is firmly in place.
A little amount of tire oil added to the valve stem will also aid in the passage of the valve stem. The shape of the valve stem prevents it from going all the way through or popping out in any direction other than backward, so all you have to do is make sure it’s pulled into the hole and seated properly before continuing.
Step 3: Mount the tire to the rim
Install the tire with the help of the machine. Then, remove the wheel from the machine mounting. Attach the rim to the tire machine using the provided tools. For processing the rim, the tire machine is set up such that it receives it with the rim facing up. Place the rim on the machine and, by pressing the proper pedal, activate the hydraulic press that holds the rim in place from underneath the machine.
The majority of tire machines are equipped with two pedals: one for activating the press and another for rotating the rim. If you’re not sure which pedal controls which function (or if your machine doesn’t have one), see the tire machine owner’s manual or the manufacturer’s website for further information.
Step 4: Placing the tire over the rim at a 45-degree angle
Place the bottom edge of the tire beneath the top edge of the rim on one side, with the tire resting at a 45-degree angle to the rim. The tire should be able to sit on its own without falling loose from the rim at this point. Preparing the mounting arm to glide into the angle gap by starting with one bead beneath its edge and allowing adequate space for it to glide into the angle gap is essential.
Step 5: Swing the mounting arm all the way down to the rim’s edge
Position the mounting arm so that it makes contact with the rim’s outer edge in the same place as the tire has previously been positioned to pass through the opening in the mounting arm. If you are unable to get the mounting arm in at this stage, you should re-adjust the tire to provide yourself with adequate space. Due to the fact that the mounting arm works like a pry bar, pushing the remainder of the tire over the rim’s lip, it must begin at the point where the tire has already crossed the lip.
Step 6: Directly point the bottom bead of the tire towards the mounting arm
Make sure that the bottom bead of the tire is pointed directly towards the mounting arm. It may be necessary to gently adjust the tire after the mounting arm has been secured in place so that it makes contact with the arm while the wheel and tire are spinning. In the majority of cases, no modifications are needed at this point but double-check to ensure that the correct angle is being used.
Configure the tire such that the arm pushes the lip down and over the rim’s edge when the tire is rotated. A common occurrence is that the angle at which the tire rests on the rim to allow for the mounting arm is already at the proper angle. If the tire begins to slide off the rim, it indicates that the tire is not properly aligned.
Step 7: Rotate the rim and tire
By pressing the pedal, you may rotate the rim and tire. As the two rotate, the mounting arm will push the tire’s bottom bead over the top edge of the rim, causing the tire to deflate. Repeat the process until the two have completed one complete round and the bottom bead of the tire has extended fully beyond the top lip of the rim.
The tire will seem to be half-installed after you’re done, with the bulk of the tire resting on the rim of the wheel. The top bead of the tire will be the only thing that stops the tire from completely settling onto the wheel while driving.
Step 8: Adjust the mounting arm
Reposition the mounting arm such that the top lip of the tire is guided onto the wheel rim. As previously said, push one side of the tire down with your hands until it dips below the top lip of the rim, then lower the mounting arm into the gap you’ve created with your hands by pressing the tire down. It is possible that you may need to use a pry to push the tire’s top bead onto the rim’s lip at that point. As soon as the mounting arm is fully lowered into place, the tire will begin to sit at an angle once again.
Step 9: Pushing the pedal again
To rotate the tire and rim, press the pedal a second time. In this position, the mounting arm will push the tire’s upper bead against the rim’s lip as the wheel and tire rotate. After completing one complete circle, both the upper and lower beads of the tire will have gone over the rim’s upper lip. The tire is now firmly connected to the rim and just needs to be inflated to complete the installation.
Step 10: Inflate the Tire
Inflate the tire with the use of an air compressor. Make sure your hands and clothes are far away from the tire before connecting the air compressor line to the end of the valve stem you previously installed. As soon as the airflow is initiated, the tire will quickly inflate.
You have to be careful though as any portion of your body or clothing that becomes caught between the tire bead and the rim’s edge will get compressed when the tire expands during inflation. Once the tire has been inflated to the proper air pressure, it is ready to be mounted.
Mount Tires To Rim By Hand
Whether you want to save money or do it like a do-it-yourself job, you will be relieved to hear that tire installation can be accomplished with your own hands and the proper equipment. Here’s what you’ll need to bring with you: lubrication for tires, a pair of pliers, a pry bar or a screwdriver, a clean piece of cloth, cardboard, and an air compressor.
Step 1: Insertion of the Valve Stem
If there isn’t a valve stem already in place, insert one. Prepare the valve stem by lubricating it with a little amount of tire lubricant and pressing it into the hole on the inner part of the rim that will later be covered by the tire. Pulling the valve stem outward from the hole with a pair of pliers will be your next step. Note that it is important to pull the stem until it is firmly lodged in the hole in the rim of the jar.
Step 2: Lubrication
Ensure that the tire bead and rim are lubricated. Even while tire lubricant is essential when mounting tires with a machine, it is very important when mounting tires by hand. Lots of lubricants should be applied to the inner bead of the tire as well as the outside edge of the rim. Apply the lubricant using a spray bottle or by hand. Inspect and reapply lubricant to the top and bottom beads of the tire as well as the whole edge of the rim to ensure that they are both properly greased.
Step 3: Positioning
Place the rim flat on the ground and the tire on top of it to complete the installation. In order to prevent scratching the surface of the blacktop or concrete you’re working on, put a piece of cardboard underneath the wheel. Make certain that the surface on which you are working is level, even, and sturdy.
Step 4: Force
Step on the tire with both feet in order to push the bottom lip of the tire on the rim of the vehicle. As you step up onto the tire on one side, ask the assistance of a buddy to keep you balanced. Then, using your other foot, push down on the opposite side of the tire to drive the bottom bead of the tire down over the top lip of the rim and into the wheel well.
It may be necessary to jump a little in order to provide sufficient downward power to drive the tire bead over the lip. You should not do this without a buddy to assist you with balance, otherwise, you may fall.
Step 5: Adding a Little More Lubrication
Increase the amount of lubricant applied to the top bead of the tire and the rim. Once the bottom bead has been placed, the true difficulty will be in getting the top bead to do the same. More lubrication should be used to assist in forcing the rubber down over the metal to make it a little simpler. The bottom bead will not need any more lubrication.
Step 6: Applying a Little More Pressure
On one side of the tire, press the top lip of the tire down onto the rim. The tire should be angled downward such that one section of the top bead is down below the rim’s edge. If the tire doesn’t quite make it over the lip on its own, you may press down on the bottom part of the tire.
A pry bar will need to be able to slip into the gap between the tire’s top bead and the upper lip of the rim so you’ll need to create adequate room between the two. It is possible that you may need to use the pry bar to make the opening. If this is the case, be sure to leave it in place after you’re finished.
Step 7: Completion
Using a pry bar, push the tire’s lip over the remainder of the rim until it is secure. Move around the wheel, pushing down on the tire with your hands and prying the bead of the tire over the top lip of the rim with your other hands as you go. This will require a significant amount of effort, but it should be completed by the time you have completed one complete round of the wheel.
Press the pry bar into the bottom side of the top lip of the rim, making sure it does not damage any exposed metal on the rim’s surface. When you’ve finished going around the wheel, both the top and bottom beads of the tire should be fully beyond the rim’s lip, as seen in the picture.
Step 8: Filling The New Tire with Air
With the help of an air compressor, inflate the tire. The tire may be inflated by attaching an air compressor to the valve stem once both beads of the tire have passed the rim’s lip. Be careful not to get your fingers or clothes caught in the tire bead while the tire is inflating. After the tire has been properly inflated, you may proceed to the next one.
Conclusion
Whether using tire mounting equipment or doing it manually, the process of putting the tire back on the rim will require some elbow grease. However, the process will get easier on the proceeding tires you’ll figure out what workaround works best.
Just always be cautious in inserting the bead breaker, or you risk damaging both the sidewall and the rim of the tire. Lastly, make use of the proper quantity of lubricant; neither too little nor too much is recommended.